
You run a SAP WM warehouse that ships 200 delivery lines per day, and your forklift operators walk the same aisles three times to prepare three different orders. 2-step picking exists precisely for this: you separate the stock removal from the per-order dispatch, you collect in a single pass everything needed for the time slot’s batch of deliveries, then you split it out in a second step toward each final destination.
On paper, it is trivial. On a project, it always gets stuck on the same pitfalls: an undersized interim storage type, a storage type search misconfigured for operation 2, deliveries too heterogeneous to benefit from grouping. Here I walk you through the full configuration, the concrete end-to-end case, and the field pitfalls I have run into on multi-site WM rollouts.
2-step picking in SAP WM, a concrete definition
In single-step picking, each transfer order represents one customer order: a forklift operator goes to fetch the materials of a given delivery, brings them to the shipping dock, and the delivery is processed. If you have thirty deliveries to prepare in the 2 PM time slot, you generate thirty transfer orders, and your operators go around the warehouse thirty times.
2-step picking changes the logic end to end. The first step, the pick, groups all the requirements of the time slot: if the thirty deliveries require a total of 12 different materials for a total of 480 pieces, you generate a single collective transfer order that removes those 480 pieces from the storage bins and brings them into a buffer area, typically a dedicated Storage Type such as 200. The second step, the allocation, splits out from this buffer area: one TO per delivery, which takes the quantity planned for each order and drops it at the corresponding shipping dock.
This decoupling has a strong consequence: the operator who does the pick does not need to know which delivery those 480 pieces will go to. They remove what is required, full stop. The dispatch business logic is carried by the allocation, which often happens close to the dock and can be driven by a different operator profile. You gain productivity on the pick side (fewer trips, an optimized route across the bins) and you gain accuracy on the dispatch side (verification on a sorting table in the buffer area before dropping at the final dock).
When 2-step picking justifies its rollout
2-step picking is not an automatic gain. It becomes relevant when three conditions add up: a volume of simultaneous deliveries high enough that grouping genuinely cuts the trips, a material mix where several orders share common materials, and a physical warehouse layout that clearly separates the storage area from the dispatch area.
Cases where 2-step delivers a real gain
- More than 50 deliveries per shipping time slot with shared materials.
- High-bay warehouse with costly trips per delivery.
- Product mix where one material recurs in ten to thirty orders per day.
- Shipping dock close to a secured sorting area.
- Morning activity peak (e-commerce type) where productivity per operator becomes critical.
Cases where 2-step adds more complexity than gain
- Low volume with fewer than ten simultaneous deliveries.
- Materials very specific to each order with no overlap between deliveries.
- Batches to trace where each batch is locked to an order upstream.
- No buffer area physically available between stock and dock.
- Hazardous or regulated materials that cannot transit through an interim area.
Before switching to 2-step, run the exercise on a real sample: take a typical day, extract the deliveries from the busiest time slot, and look at how many materials are shared across orders. If the material-to-delivery ratio is close to 1, you have nothing to group, and 2-step adds a buffer area and an extra TO for nothing.
SAP WM configuration in 5 steps
The configuration of 2-step picking is done in two distinct SPRO families depending on whether your trigger is a transfer requirement (TR) or a delivery. In WM project practice, you usually activate both to cover Posting Change Notices and commercial outbound flows.
- 1
Activate 2-step picking for transfer requirements
SPRO path:
Logistic Execution → Warehouse Management → Activities → Transfers → Set up 2-step picking process for Transfer Requirement
There you find two sub-items: Transfer Requirement Control and Transfer Type Control. The first activates 2-step for the TR types (for example the type that drives the PCNs). The second defines the behavior of the transfer type that will be used for the collection to the interim area.
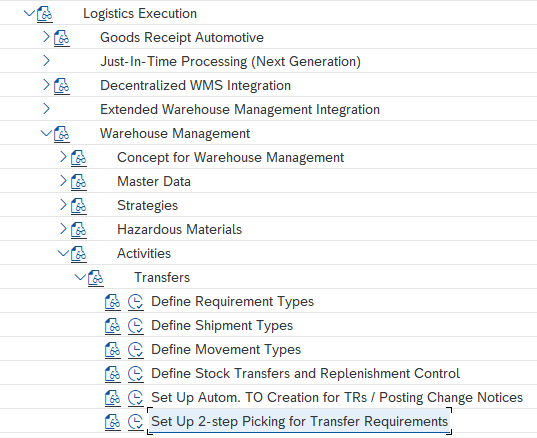
The SPRO node “Set up 2-step picking process for Transfer Requirement” opens two entries: the TR control and the associated transfer type control. 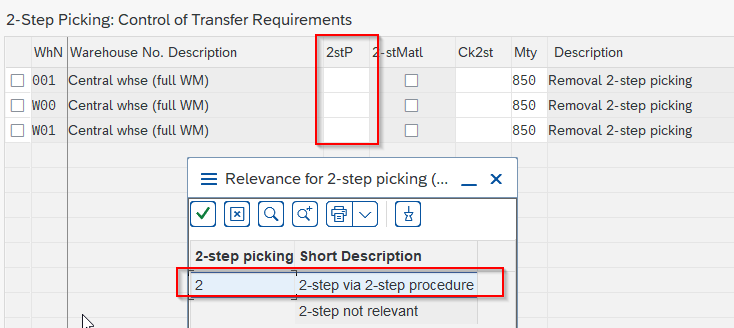
Transfer Requirement Control: every TR type you want to make eligible for 2-step must be ticked here. Remember the rebooking-type TRs if you handle PCNs. 
Transfer Type Control: the transfer type used for the pick must be configured to open a movement toward the interim area, not toward the final dock. - 2
Activate 2-step picking for shipping
SPRO path:
Logistic Execution → Shipping → Picking → Define Relevance for Two-step Picking
This is the counterpart on the delivery flow side. Here you define on which level (route, shipping point, warehouse) 2-step should be triggered. The most common setting is by warehouse number plus shipping point, which lets you keep 1-step for flows that are not suited to it (express outbound, technical outbound).
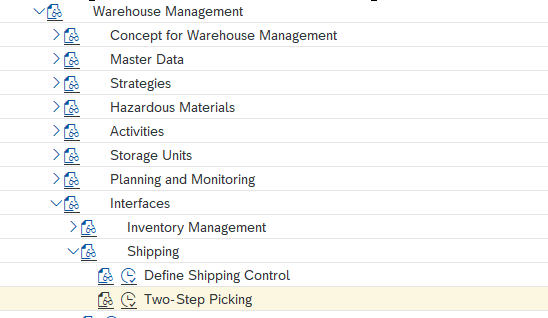
The activation screen on the shipping side: choose the granularity that matches the operational reality of your shipping flows. 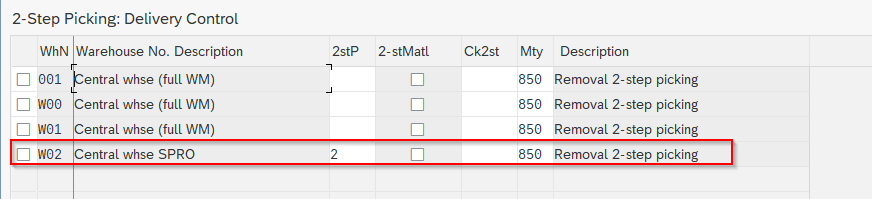
Shipping customizing detail: you can activate 2-step for a specific warehouse / shipping point combination, which isolates the flows concerned. - 3
Configure the Storage Type Search for operation 2
SPRO path:
Logistic Execution → Warehouse Management → Strategies → Activate Storage Type Search
This is where you tell SAP where to drop the picked pieces: you create an entry with operation
2(which corresponds to the 2-step interim) and you enter the target Storage Type, by convention200in most projects, but it can be any Storage Type that you have defined as a buffer area.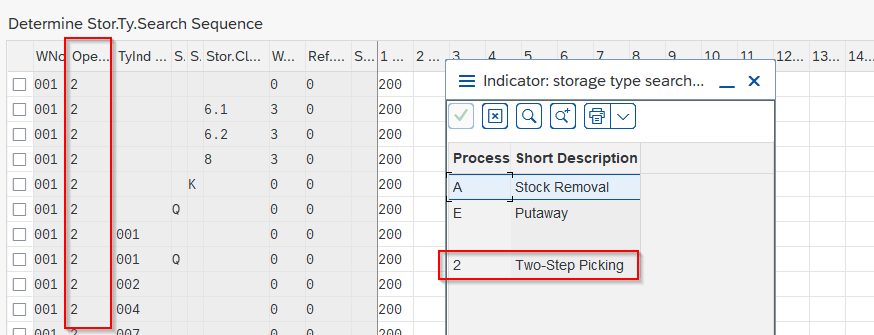
Storage Type Search with operation 2: the combination (warehouse, storage type search indicator, operation 2) points to the interim storage type of your 2-step. If you want to understand in detail how the search sequence interlocks with the other tiers (storage section, storage bin type), look at the dedicated article on SAP WM Storage Type Search. The 2-step is only one operation among others in the same strategy table.
- 4
Activate the flag on the material master (WM view 1)
If you want 2-step to trigger only for certain materials, you activate the “2-step picking relevant” flag in the Warehouse Management 1 view of the material master. This is useful when you have 1-step and 2-step flows coexisting in the same warehouse: you can thus exclude very bulky materials that cannot transit through an interim area.
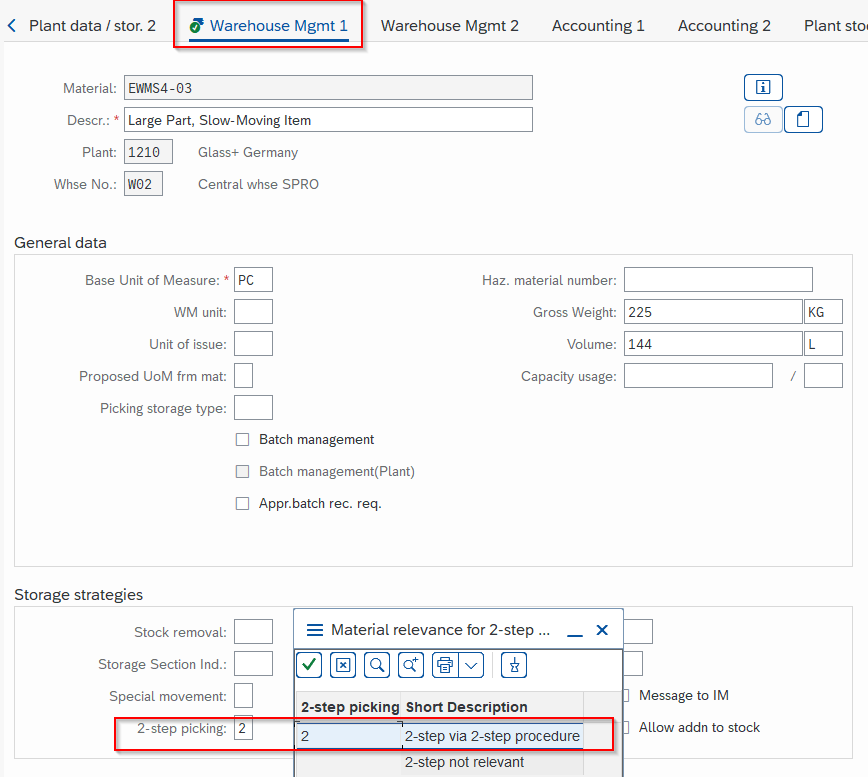
WM 1 view of the material master: the “2-step picking” flag determines whether the material is taken into account in the grouping. - 5
Check consistency with the Section and Bin Type cascade
2-step picking does not live in isolation from the rest of the WM strategy. If you have activated a Storage Section Search or a Storage Bin Type Search on the interim storage type, check that the combination stays consistent. The classic pitfall: area
200has inherited a section strategy that makes no sense for an interim, and SAP refuses to create the TO. Deactivate section and bin type search on the interim storage type unless you have a precise business need that justifies them.
Concrete end-to-end case: from the PCN to the shipped delivery
Here is how it unfolds in execution, on an example where the trigger is a series of commercial deliveries. The scenario is deliberately minimal so that you recognize each screen. You will find the same sequence by replacing VL06P with LT41 if your trigger is a transfer requirement (typically a Posting Change Notice after a stock rebooking).
- 1
Create the group from the deliveries
Transaction
VL06P. You select the outbound deliveries of the time slot (filter on shipping point, route, planned goods issue date) then you use the “Create Group” function from the menu. SAP asks you to name the group and assign a usage: for 2-step picking, it is the standard grouping usage.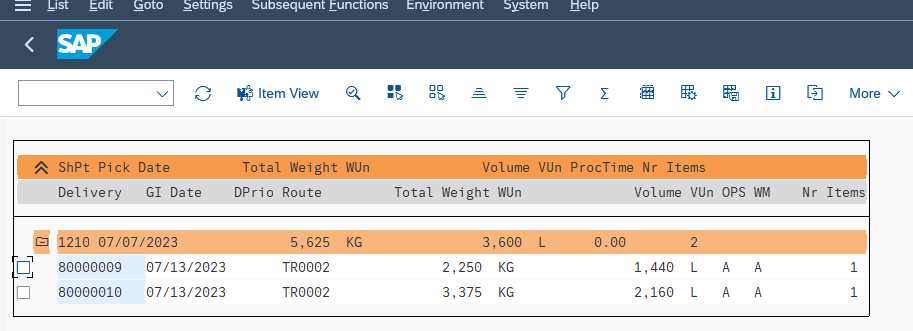
VL06P: the list of eligible deliveries, filtered on the shipping point. You select the lines that will share the same pick group. 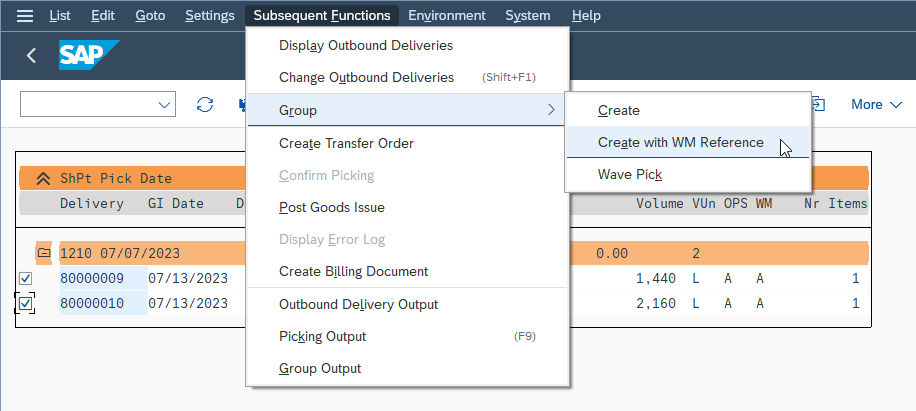
Group creation: this is the number that will drive the collective pick then the per-delivery allocation in the rest of the process. - 2
Display the group and trigger the pick
Transaction
LX39. The selection screen asks you for the warehouse and the group number. Once confirmed, you get the 2-step control screen with two distinct sections: Pick at the top, Allocation at the bottom. You start with the Pick section.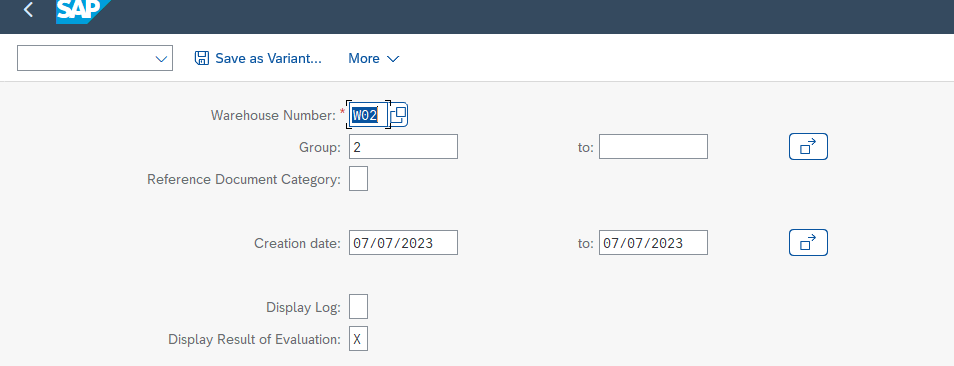
LX39: the selection asks for the warehouse number and the group number. You can also filter by TO status if you resume a process. 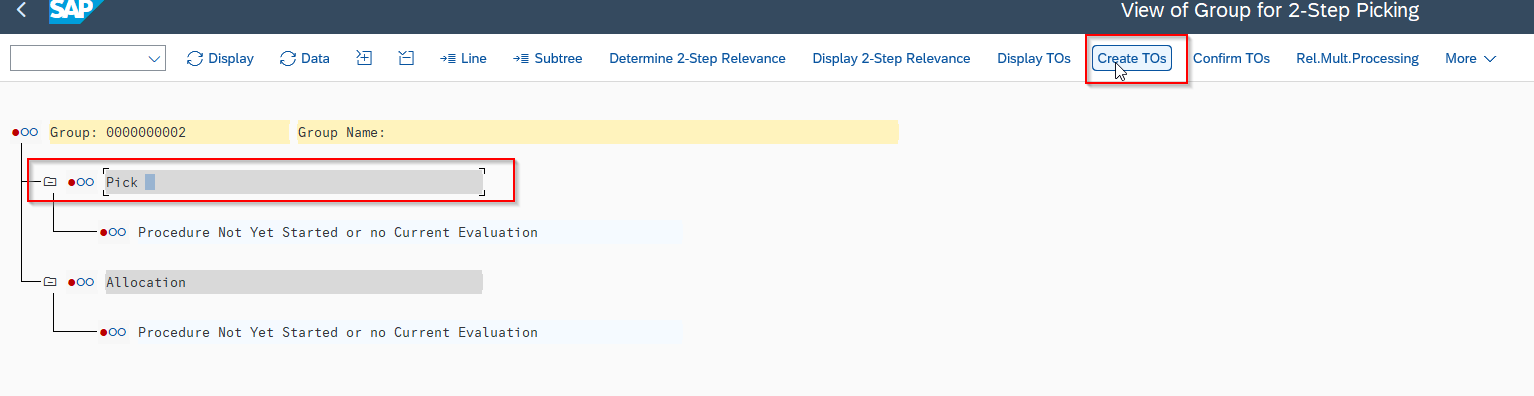
Pick section of LX39: the consolidated list of all the materials to remove, aggregated by source bin. SAP has merged the requirements of the deliveries in the group. - 3
Generate the pick transfer order
Still in LX39, from the Pick section, you trigger the creation of the collective transfer order. SAP generates a single TO that will remove all the pieces of the time slot and bring them into the interim area, the Storage Type
200of your customizing.
Pick transfer order: a single TO for the whole time slot, which consolidates the source bins and designates the interim area as destination. - 4
Confirm the pick on the warehouse side
Once the operator has passed by the source bins and arrived in the interim area, the TO is confirmed via
LT12or directly from LX39. The confirmation materializes the physical transfer: the stock disappears from the source bins and appears in storage type 200.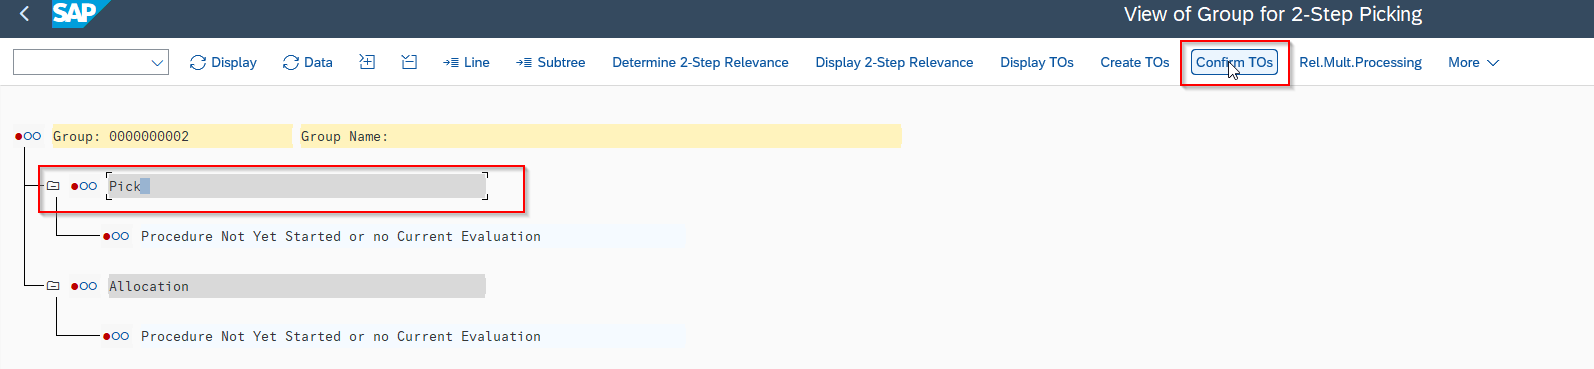
Confirmation of the pick TO: the collected quantity is now visible in the interim area and available for the allocation step. 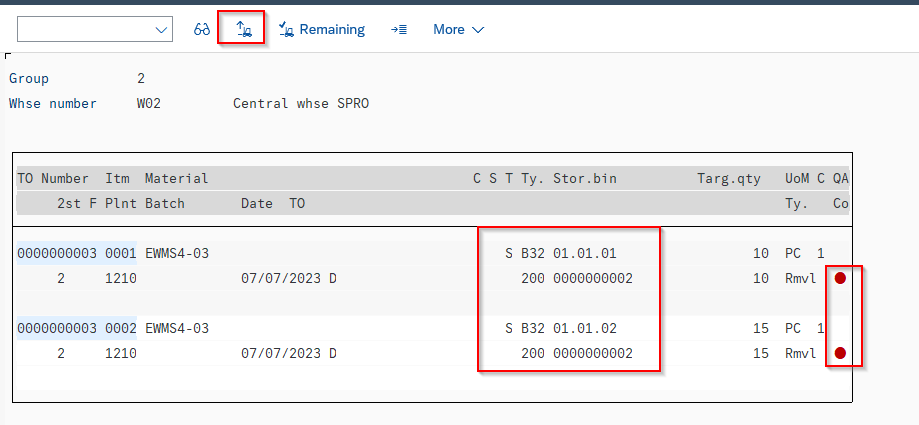
Confirmation screen: for radio frequency flows, this step is done directly from the mobile terminal without going back through the GUI. 
Pick OK status: the group is marked as ready for allocation. The cascade can continue. - 5
Dispatch with the allocation
Back into LX39, the Allocation section this time. You generate one transfer order per delivery, which takes from the interim area the quantity intended for each order and drops it in the final preparation area (usually another interim storage type, such as area 916 or 902 depending on your configuration). Confirmation via LT12 and you can move on to the post goods issue on the delivery side.
The elegance of the model is that you can parallelize the two steps: while one operator does the pick of the next time slot, an operator in the interim area allocates the previous time slot. The theoretical throughput climbs, provided your interim area is sized to absorb the time gap between the two operations.
Field pitfalls to anticipate
Beyond this basic check, here are the three pitfalls that come up most often on a project:
Saturated interim area. If the pick pace is faster than the allocation pace, storage type 200 saturates, and the new pick TOs are blocked for lack of an available bin. This is typically what happens when you launch 2-step without having audited the physical capacity of the buffer area. Practical rule: size the interim area to absorb at least two shipping time slots.
Confusion between shipping group and pick group. SAP uses the word “group” in several places. The group you handle in VL06P is a grouping of deliveries for 2-step control. It is not the same as a wave (which is another grouping logic, more planning-oriented). If your warehouse already uses waves, check that the 2-step group does not break the existing wave logic.
Materials with batch or expiry date. If you do FIFO or management by batch determination on the materials concerned, check that the batch determination is done at the level of the pick transfer order and not at the level of the delivery. Otherwise, two deliveries that request the same material may end up with different batches when they should have shared the same batch, and you break your FEFO logic without noticing it.
2-step picking in WM and in EWM, the key differences
A misconception circulates widely: that 2-step picking would be a specificity of legacy WM, and that EWM would not offer it. That is false. EWM offers its own 2-step picking, in a more modern framework. Here is what changes when you move from one to the other.
In practical terms, on a WM to EWM migration project, 2-step picking is never a 1:1 mapping. You replay the business need (why you do 2-step) before looking at how EWM carries it technically. And you take advantage of the migration to rework design choices that sometimes dated back more than ten years.
“2-step picking is above all a warehouse organization decision. SAP WM or EWM only materializes a choice that must first have been made on the operations side.”
FAQ: 2-step picking SAP WM
Must the interim storage type necessarily be 200?
No. 200 is a convention inherited from the SAP examples, but you can use any storage type that you have defined as a buffer area. What matters is that this storage type is declared in the Storage Type Search for operation 2, and that it is configured as an interim area (not as a long-term storage area).
Can you do 2-step picking without going through a group?
Technically no, the group is the pivot of the 2-step model in WM. But you can automate its creation: a batch job that runs VL06P with a fixed variant creates the group automatically at each shipping time slot, without user intervention. Most warehouses in production work this way.
What happens if a delivery in the group is canceled after the pick?
The removed stock stays in the interim area and must be reposted manually to its original storage type, typically via an 850/851 movement or an ad hoc transfer order. This is a putaway operation that must be documented in the operational procedure, because it is invisible on the delivery side (which is already canceled) and can generate phantom stock in the buffer area if it is forgotten.
Is 2-step picking compatible with radio frequency?
Yes, fully. Both steps (pick and allocation) can be confirmed in RF via the standard transactions. That is precisely where 2-step makes full sense: the collective pick optimized by bin route and the immediate confirmation on the mobile terminal save time at every cycle.
Do you need a dedicated Storage Section Search on the interim storage type?
In the vast majority of cases, no. The interim area is a transit area, not a differentiated storage area. If you activate a Storage Section Search on storage type 200 without a precise business need, you risk blocking the creation of the pick TOs through a strategy incompatibility. Deactivate section and bin type search on the interim area except in special cases (for example, physical separation of hazardous materials in the buffer area).
2-step picking and the WM cascade, how to articulate them
2-step picking is a special case of the general Storage Type Search mechanism in SAP WM. If you want to understand how the Storage Type → Storage Section → Storage Bin Type cascade interlocks within the overall strategy of a warehouse, look at the article on SAP WM Storage Type Search, which explains tier 1 in detail, and the one on Storage Section Search, which covers tier 2. For tier 3 on bin types, the article Storage Bin Type Search closes the loop.
2-step picking, for its part, lives at the crossroads of the Storage Type strategy and the delivery / transfer requirement flow. It is a pattern that looks simple but demands real operational discipline: a sized interim area, a balanced pick / allocation pace, and well-rehearsed exception procedures (cancellations, shortages). When these three conditions are in place, the productivity gain is immediate and measurable from the very first weeks.
Keep reading
SAP WM storage section search: tier 2 putaway (T334B)
In the WM scoping workshops with the key users, the Storage Section Search is often the one we deal with last. We quickly cover the Storage Type (the zone) and...
SAP WM storage type search: tier 1 putaway setup
On S/4HANA Supply Chain kickoffs, the end of SAP WM has become a recurring topic. And the discussion systematically drifts toward the putaway cascade. How does the Storage Type Search...
SAP WM storage bin type search: the complete guide (2026)
"My transfer order is going to the wrong bin, and we can't figure out why." If you work on an SAP WM project, you've definitely heard this sentence. Often during...
SAP EWM Master Data Integration: ERP Sync with CIF, ALE, DRF
Since the move to S/4HANA, the question "how do you synchronize data between SAP ERP and EWM" no longer has the same answer, and many projects still get it wrong...